Upgrading HugoBlox
Keeping your site updated ensures you have the latest features, security patches, and performance improvements.
We know that maintaining a website can be a chore—especially for busy researchers and data scientists. That’s why we’ve built a Zero-Touch Automated Upgrader to handle the heavy lifting for you.
🤖 The Automated Way (Recommended)
Section titled “🤖 The Automated Way (Recommended)”The most robust way to upgrade is to let our GitHub Action do it for you. It runs weekly, checks for updates, applies migrations automatically, and creates a safe Pull Request for you to review.
How it works
Section titled “How it works”- Weekly Check: Every Monday, the bot checks if a new stable version of HugoBlox is available.
- Smart Migration: It runs the HugoBlox CLI to update
go.mod, patch config files, and apply any required breaking-change migrations. - Safe Proposal: Instead of breaking your live site, it opens a Pull Request (PR) titled “⬆️ Upgrade HugoBlox Modules”.
- Review: Go to your GitHub repository and open the Pull requests tab. Click the upgrade PR. If your repo has deploy previews enabled (for example, GitHub Pages or Netlify), click the Deploy Preview link in the PR checks/comments to preview the updated site before merging.
- Merge: If the preview looks good, scroll to the bottom of the PR page. Click the arrow next to the merge button, choose Squash and merge, and then click Confirm squash and merge. (We recommend squash merging to keep your repo history clean and make rollbacks easier.)
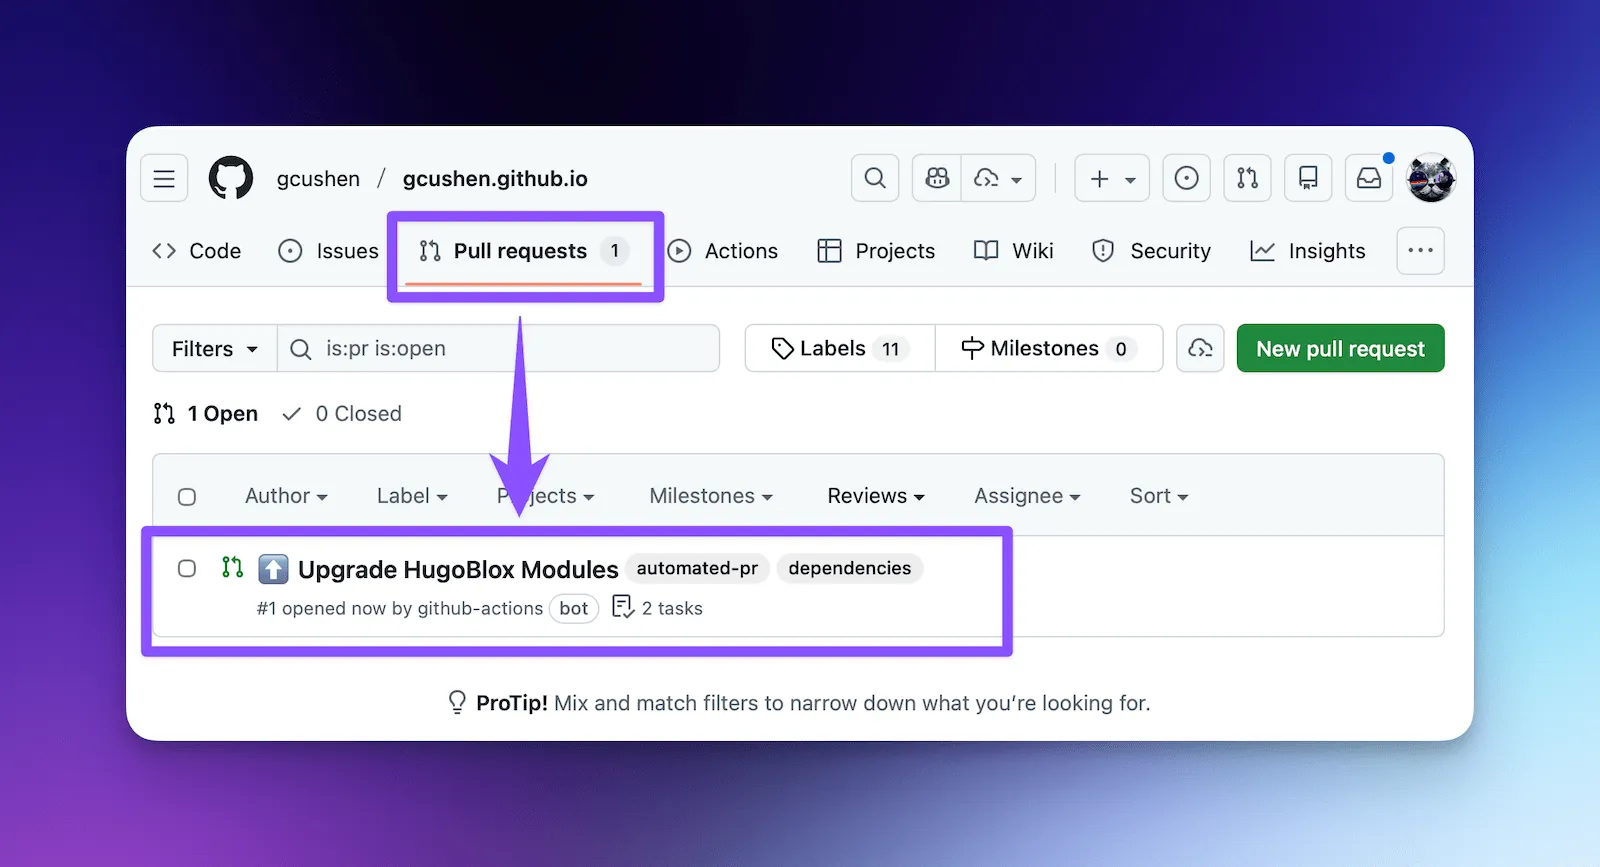 (The updater creates a PR for you)
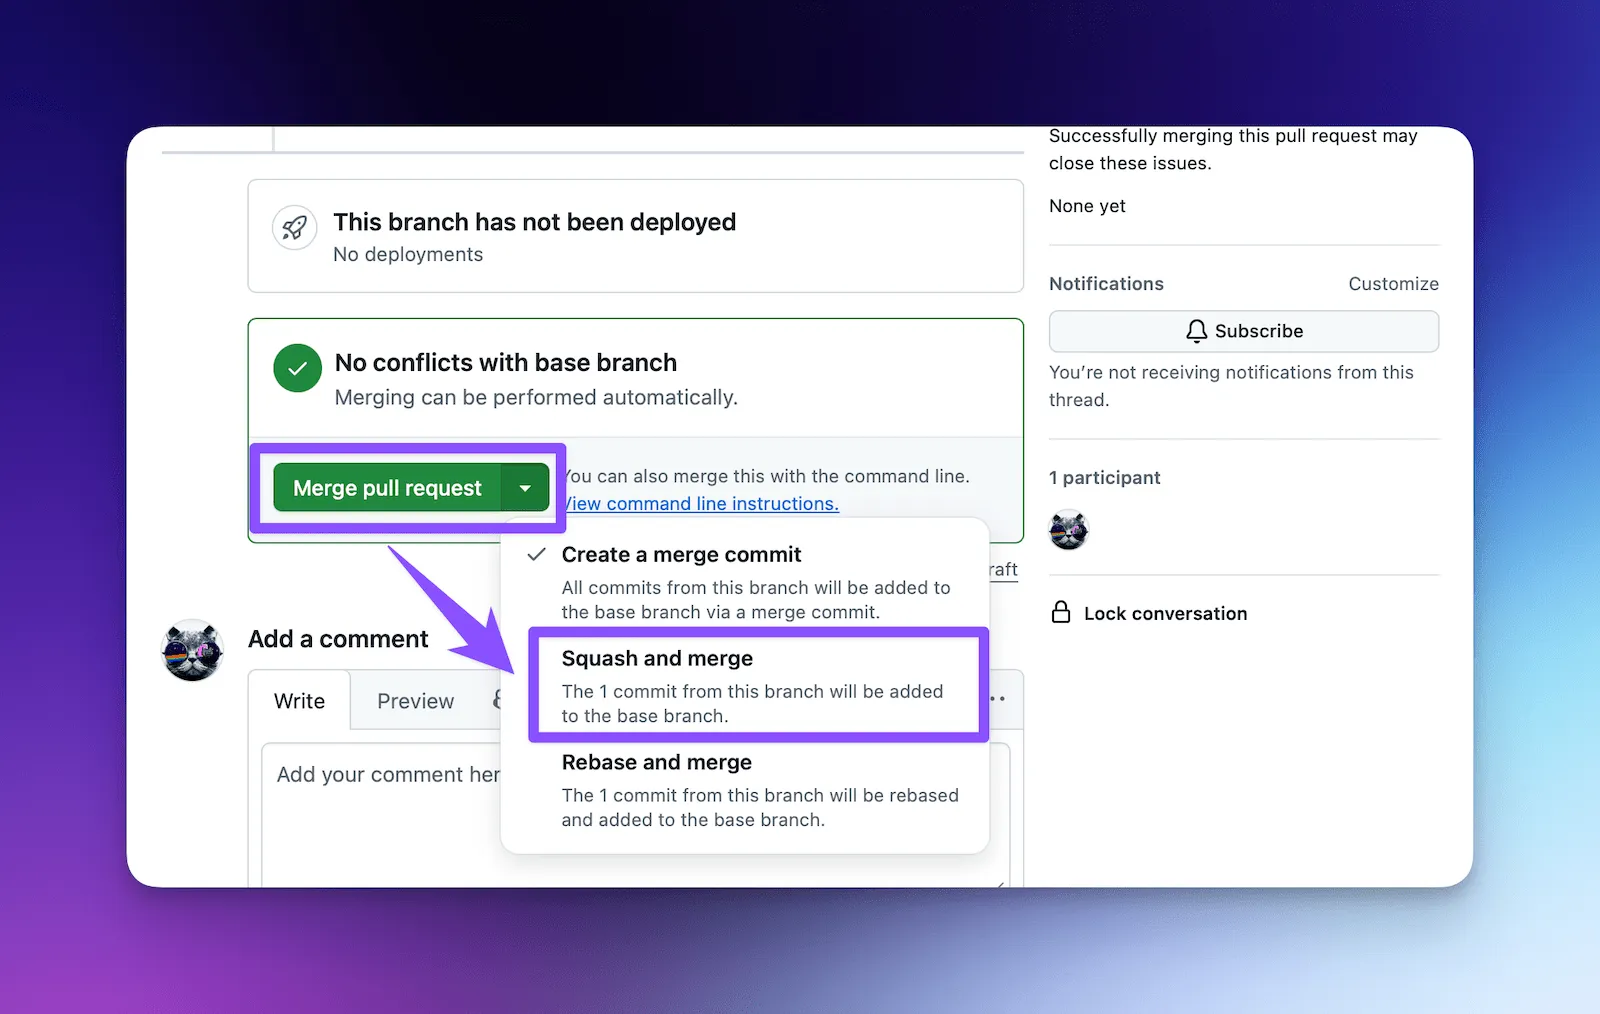 (Review the changes and merge)
Setting it up
Section titled “Setting it up”If your repository doesn’t have the updater yet, you can add it in 2 minutes.
Prerequisite: Enable Pull Request Permissions
Section titled “Prerequisite: Enable Pull Request Permissions”For the automated upgrader to create Pull Requests, you need to enable the following permissions in your GitHub repository (these permissions control what GITHUB_TOKEN can do in workflows):
- Go to your GitHub repository, then open Settings.
- In the left sidebar, click Actions, then click General.
- Scroll to the bottom until you see Workflow permissions.
- Select Read and write permissions.
- Enable Allow GitHub Actions to create and approve pull requests.
- Click Save.
If you skip this step, the workflow may run but fail to open a PR.


Install the Workflow
Section titled “Install the Workflow”-
Create the workflow file
In your repository, create a new file at this path:
Directory.github
Directoryworkflows
- upgrade.yml
-
Paste the configuration
Copy the code from
templates/academic-cv/.github/workflows/upgrade.ymlintoupgrade.yml. -
Commit and relax
Commit the file to your default branch (usually
main). That’s it! You’ll now receive updates automatically.
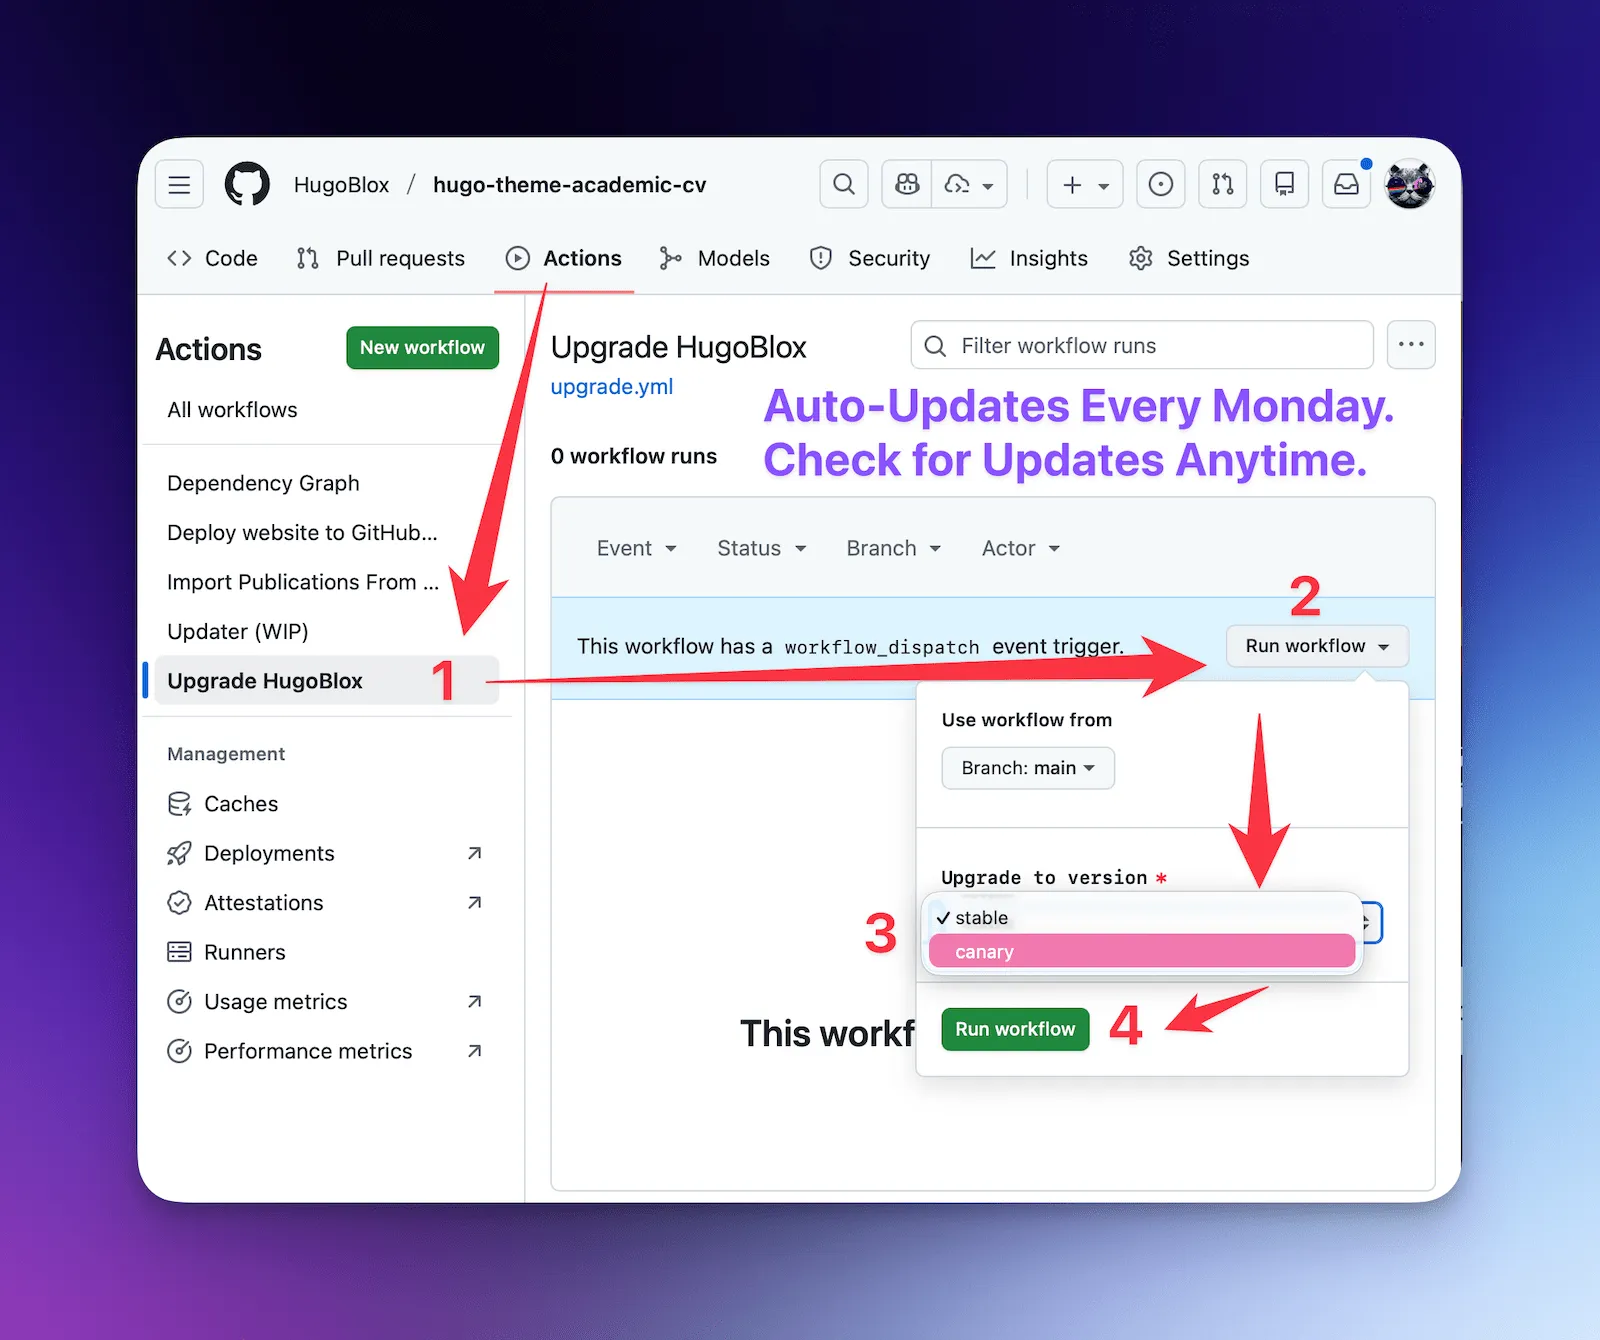
Manually triggering an update
Section titled “Manually triggering an update”Don’t want to wait for Monday? You can trigger the updater anytime:
- Go to the Actions tab in your GitHub repository.
- Select Upgrade HugoBlox from the sidebar.
- Click the Run workflow dropdown.
- (Optional) Choose Stable (default) or Canary (bleeding edge).
- Click the green Run workflow button.
💻 The CLI Way (Local)
Section titled “💻 The CLI Way (Local)”If you prefer working in your local terminal, you can run the same upgrade logic manually.
-
Open your project
Terminal window cd my-hugo-blox-site -
Run the upgrade command
Terminal window # Interactive (recommended locally)npx -y hugoblox@latest upgradeThe CLI will check for updates and verify Hugo compatibility. If you use
--yes/--ci, it will also apply any required migrations automatically.Terminal window # Non-interactive (good for scripts/CI)npx -y hugoblox@latest upgrade --yes -
Preview changes
Terminal window pnpm dev
Advanced Options
Section titled “Advanced Options”--canary: Upgrade to the latest development commit (main). (Bleeding edge.)--force: Upgrade even if your local Hugo version is older than required.--apply-migrations: Apply migrations after upgrading (useful if you want to apply them during an interactive run).--skip-migrations: Skip migrations (even in--yes/--ci) if you want to review changes first.
❓ Common Questions
Section titled “❓ Common Questions”Why are there breaking changes?
Section titled “Why are there breaking changes?”We know breaking changes are annoying. However, HugoBlox is built on top of Hugo, the world’s fastest static site generator. Hugo is actively developed and frequently releases major improvements (like the recent shift to Tailwind CSS v4) which sometimes require changes to how sites are built.
Our automated upgrader is designed to bridge this gap. It contains “fixer” scripts that automatically rewrite your configuration to match the new requirements, letting you focus on your research and content, not on syntax changes.
I’m on a “Canary” build. Will the auto-updater downgrade me?
Section titled “I’m on a “Canary” build. Will the auto-updater downgrade me?”No. We have built a smart safety check into the updater. If you are using a development version (Canary) that is newer than the latest stable release, the updater will skip the update to prevent downgrading your site. You will only be prompted to update when a newer stable version is released that supersedes your dev build.
The workflow ran, but no PR was created. Why?
Section titled “The workflow ran, but no PR was created. Why?”This is almost always a permissions/config issue in GitHub:
- Confirm Settings > Actions > General > Workflow permissions is set to Read and write permissions.
- Confirm Allow GitHub Actions to create and approve pull requests is enabled.
- Re-run the workflow and check the workflow logs for permission errors such as “Resource not accessible by integration”.
- If your repo has strict branch protection rules, ensure the workflow is allowed to push a branch and open a PR against your default branch.
I need help!
Section titled “I need help!”If an upgrade fails or your site looks wrong in the preview:
- Check the PR Body: The automated PR often contains notes about what changed.
- Ask AI: Paste the error into the HugoBlox AI Assistant.
- Community Support: Join our Discord community where other researchers and the core team can help.