☁️ Hosting
Sites built with Hugo can be deployed to almost any provider due to the static nature of the generated website.
Have you considered making a professional, memorable impression on your visitors with your very own personalized domain name? Get a personalized domain name and learn how to set it up.
If you create your site using the tutorial, it will be automatically deployed to the recommended provider for small sites, GitHub Pages.
Let’s take a look at GitHub Pages and some of the alternatives below.
Netlify
Users recommend deploying a site with Netlify for the most convenient and scalable experience.
Why should I consider Netlify over GitHub Pages? GitHub Pages is convenient as it is built-in to GitHub. However, GitHub Pages is not a dedicated hosting provider, so it has very limited functionality, whereas Netlify empowers you with more options and enables you to scale your site to perform well under high-traffic.
Netlify is free and provides ultra-fast global access, automated deployment when you add content, and automatic HTTPS security. What’s more, Netlify facilitates account management for the CMS, contact forms, private pages, and deploy previews out-of-the-box.
To deploy with Netlify, either:
- Choose a template and then click the link to deploy the site with Vercel
Or,
- Login to Netlify and choose the option to import your site from GitHub
- (alternatively, drag-and-drop the contents of Hugo’s
publicfolder from your computer after running thehugocommand)
- (alternatively, drag-and-drop the contents of Hugo’s
GitHub Pages
GitHub Pages is GitHub’s free website hosting platform.
Go to Github and register for an account if you have not done so already. Github encourage using your real name as your username, and this can help your Github URL (which you will be assigned later) to have a professional appearance.
GitHub can execute a workflow to automatically build your site and deploy it to GitHub Pages everytime you update content in your GitHub repository.
Create a file named publish.yml in the .github/workflows/ folder of your site, creating the folders if necessary.
Edit your publish.yml and paste the GitHub Pages workflow for Hugo.
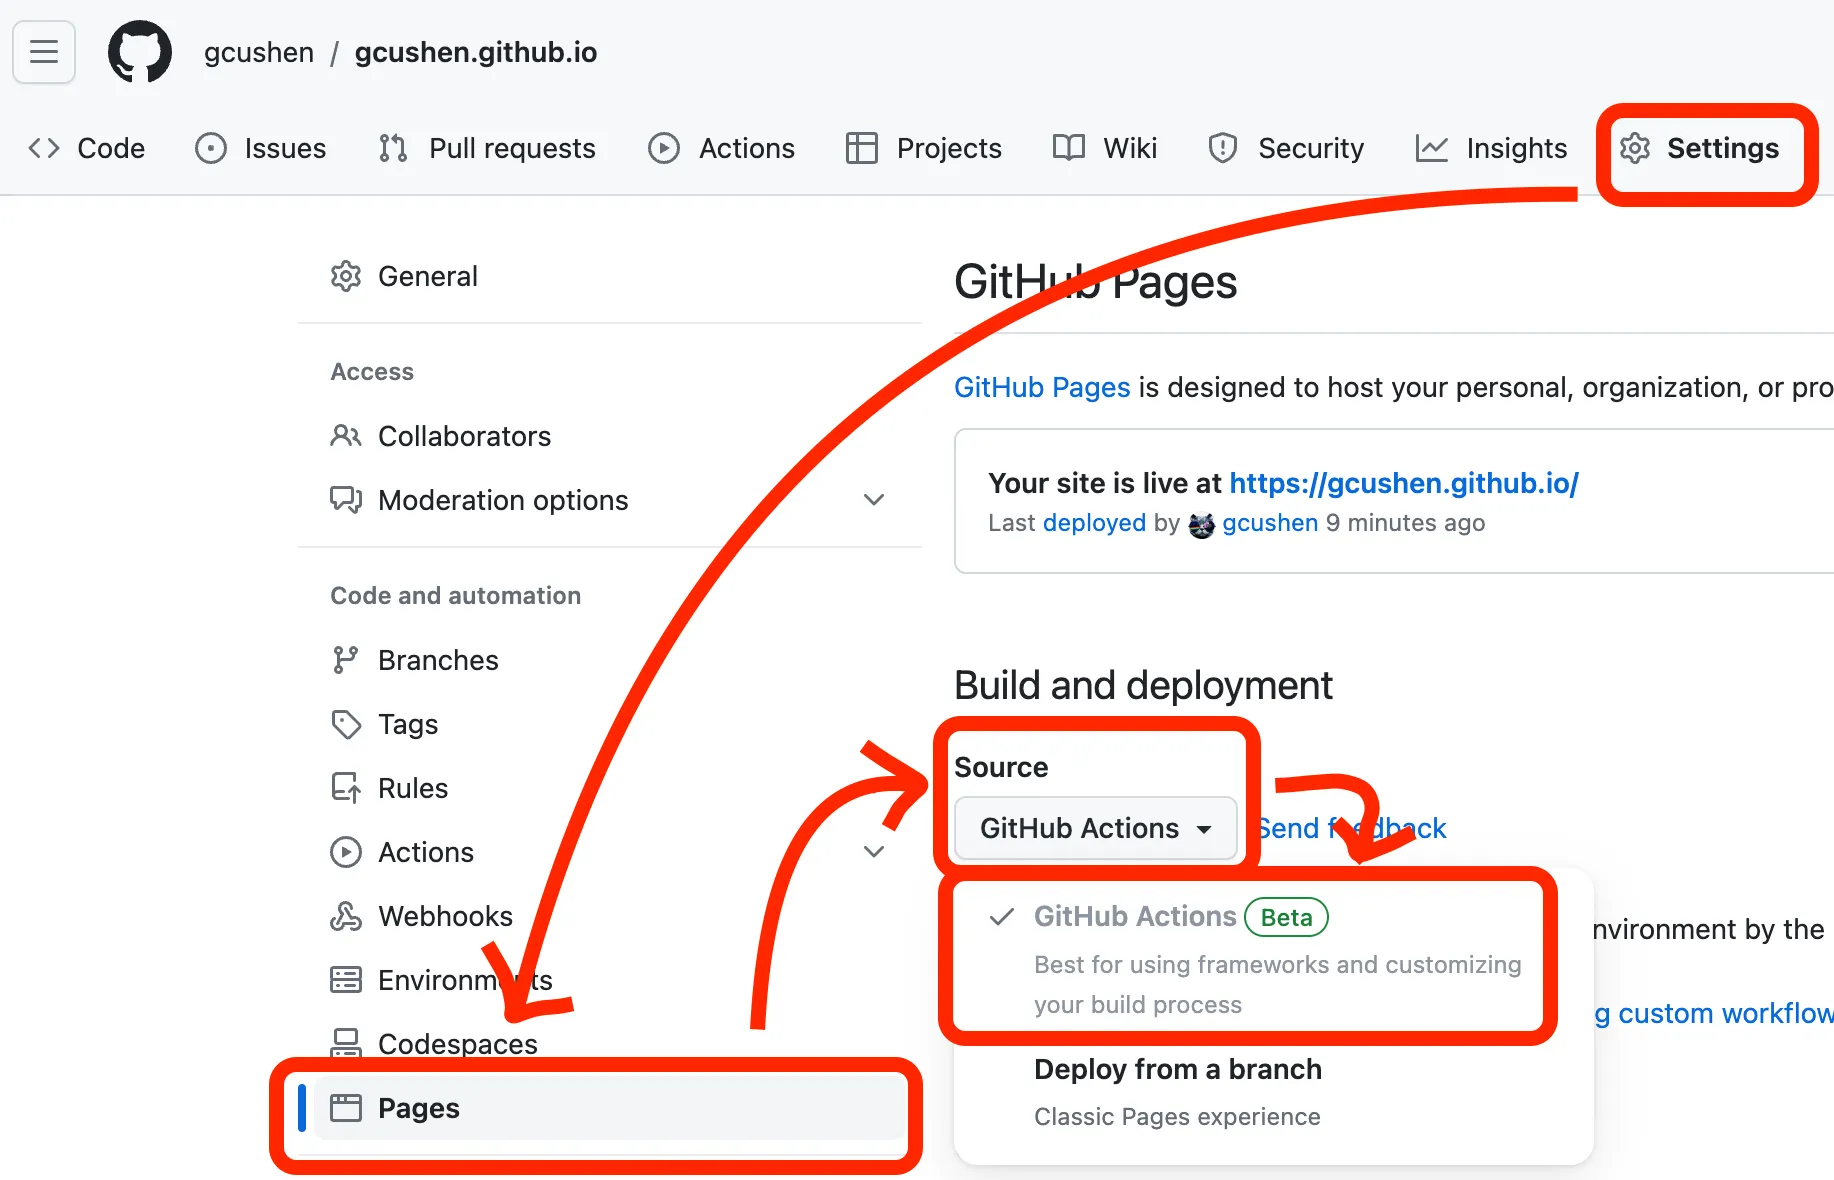
Tell GitHub that you want to use GitHub Pages to host your website by clicking Settings > Pages > Source and then choosing GitHub Actions.
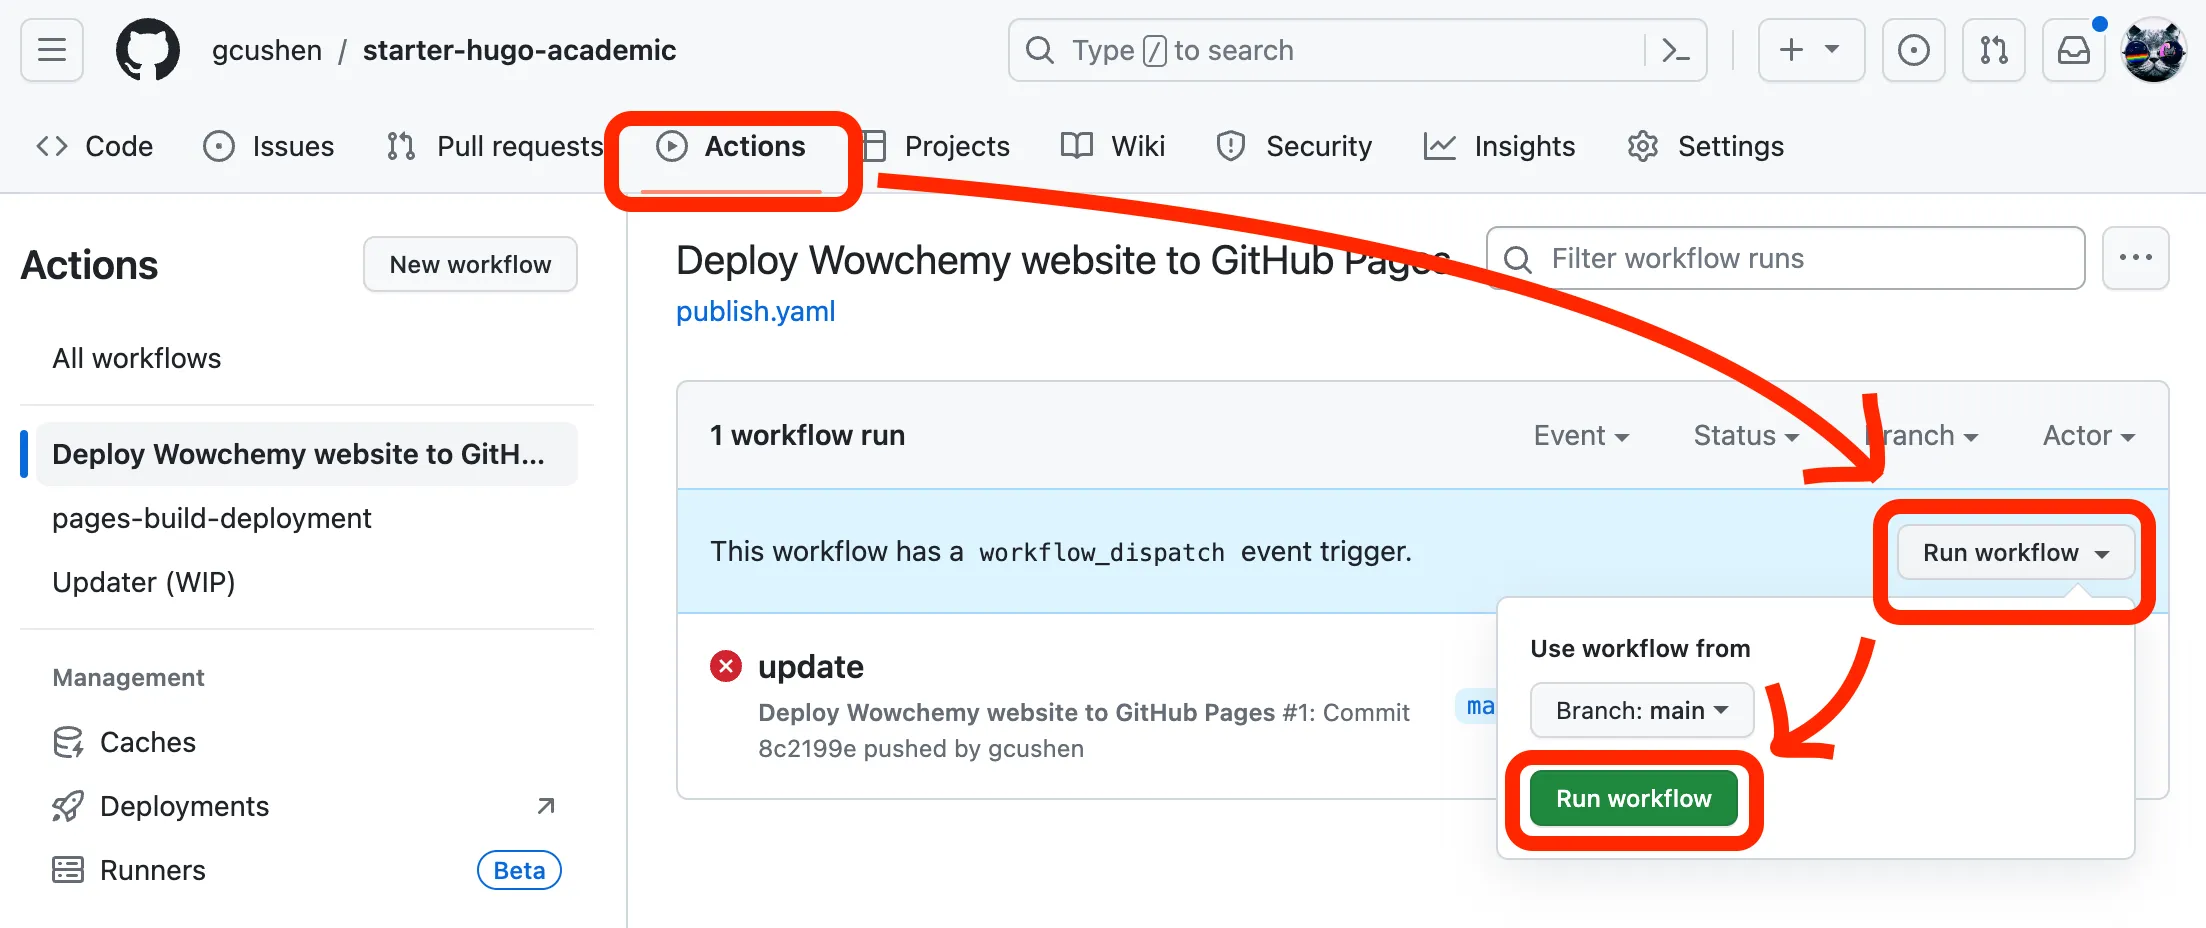
Now head to Actions > Deploy Website > Run workflow and click the Run workflow button to publish the site with GitHub Pages hosting:
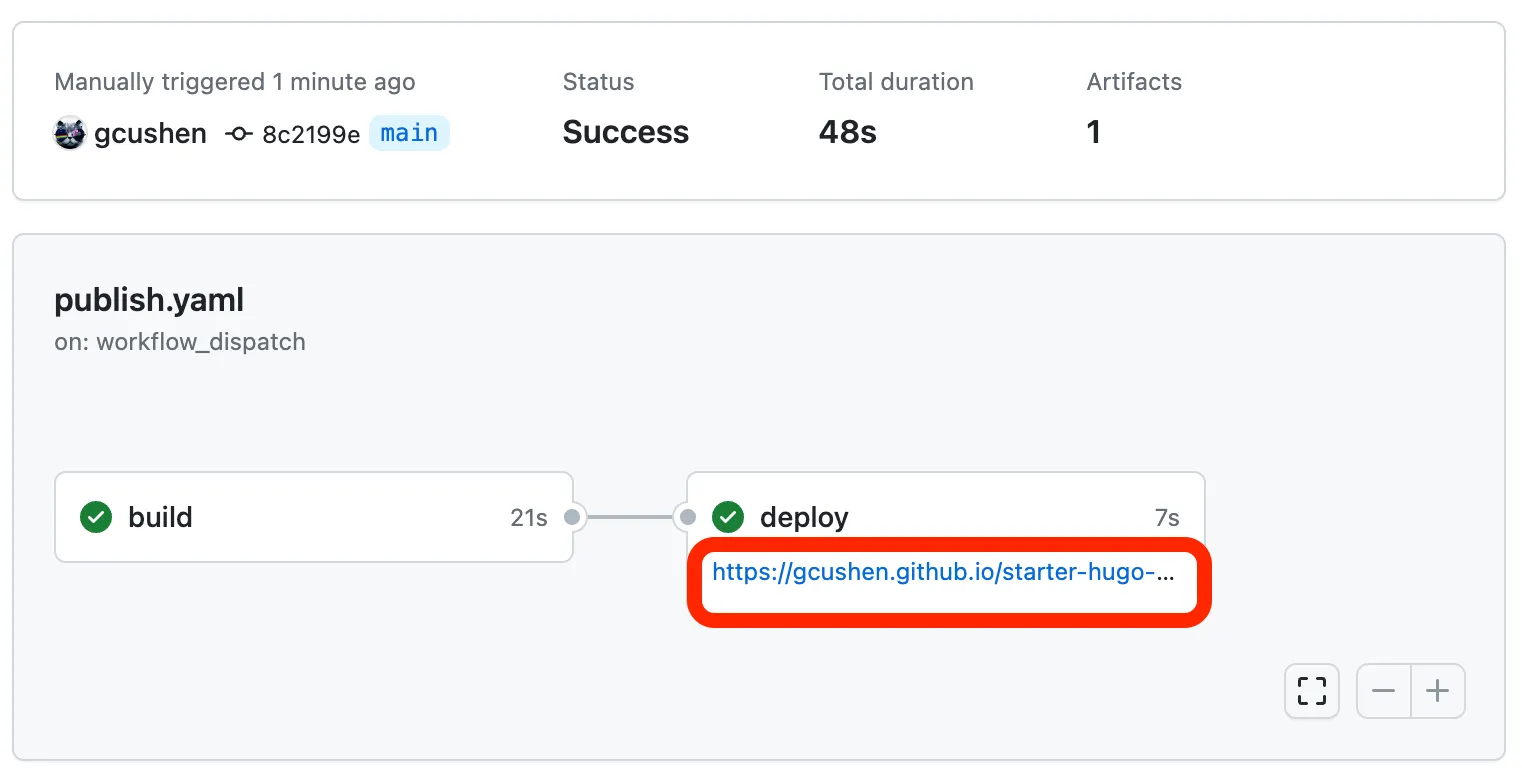
GitHub will now build your website - this can take a minute or two.
Once GitHub has built the website, a green tick should appear on the Actions page.
Open your website by clicking the URL underneath deploy:
Questions? Learn more about this GitHub Action for Hugo.
Cloudflare Pages
- Login to the Cloudflare dashboard and select your account
- In Account Home, select Workers & Pages > Create application > Pages > Connect to Git
- Select your site’s GitHub repository, and in the Setup builds and deployments section, provide the following configuration:
| Configuration | Value |
|---|---|
| Production branch | main |
| Build command | hugo --gc --minify |
| Build directory | public |
Learn more in Cloudflare’s tutorial.
Vercel
To deploy with Vercel, either:
- Choose a template and then click the link to deploy the site with Vercel
Or,
- Go to the Vercel Dashboard and import your site’s GitHub repository
Then, configure your site in the Vercel Dashboard:
- Configure the project by selecting Hugo as the Framework Preset
- Toggle the Override buttons for the Build Command and Install Command to override them with the following:
- Set the Build Command to
hugo --gc --minify - Set the Install Command to
yum install golang
- Set the Build Command to
S3, GCS, and Azure
By uploading the contents of your public folder to Amazon S3, Google GCS, or Microsoft Azure, your site can be served with dynamic scaling to almost unlimited traffic.
This approach has the benefit of being one of the cheapest, and most reliable hosting options available as you only pay for what you use.
Hugo comes with built-in commands to help automate deployment to these providers.
FTP
Use an FTP client to upload the contents of your public folder to a web host. This may be especially convenient for academic students and staff who are provided with university hosting.
Schedule publication of upcoming content
Learn how to schedule daily builds to publish upcoming content, such as blog posts and courses, according to their dates.